Hope everyone had a fantastic Valentine's Day. Here is our last post of hearts for love... I know it's a bit late for this year around but it's never to early to find inspiration for next year!
I want to share these adorable tea bags I've made with my Sister. She primarily made them for her boyfriend, they turned out so cute we just had to make more. We made them for her Sunday school kids to give to their parents, and I made a couple for my sons teachers.
The idea came from this blogger who explains great instructions.
http://asubtlerevelry.com/handmade-valentine-youre-tea-riffic
We tried it out that way but also made our own adjustments.
First of all we cut out several different shapes of hearts, also some straight ended and some scalloped (the scalloped ones were a bit of a pain to cut). Coffee filters is actually what is used to make these tea bags and they can start to rip if they are over worked, this mainly happened at the final sewing step.
One change we started making is, we started off by sewing the two hearts together at the centre "v" part of the heart. We stopped just diagonal from that point and left a length of string to sew the rest once filled. Once it is completely sewn, we left a long enough tail to make the pull string that now comes from the centre of the heart which I think is very cute. This way also eliminates having to punch a whole in the heart, which is one less thing you have to do. And of course a printed tag finishes off the tea bag perfectly.
The other thing I want to tell you is the sewing method in the original post is certainly nice and practical... But it takes forever! We found that a straight stitch worked up a lot faster and actually created quite a nice look and certainly still holds the contents in place.
For our tea we used dehydrated strawberries and kiwi. And added some rock sugar for sweetening which is some German brand that I cannot translate. We let the kids fill them up and finished sewing from the point we left off.
I placed the ones for my sons teachers, in small ziplock bags with labels describing the flavour.
And that's our home made tea experience! I think they are very clever and unbelievably cute! And who doesn't love a cup of tea! This obviously made a great valentines gift, but the possibilities are really endless since you could do any shape. And any flavour for that matter, just dehydrate whatever fruit you want and there you go. You could also use leaf tea bought at specialty tea stores, or I thought of dried apples and cinnamon sticks. I could have a hay day and I'm sure you could too. Enjoy!
Be inspired...
Get Creative!
Showing posts with label Crafts With Kids. Show all posts
Thursday, 14 February 2013
Wednesday, 13 February 2013
Lollipop Heart Flowers
HAPPY VALENTINE'S DAY!!!
My next post are these adorable lollipop flowers. At first glance they are a pretty flower... But the petals are made of hearts! And that's what makes this craft so special.
It's quite easy too! We used plain coloured card stock to cut the pieces. For each flower you need three hearts, one leaf and a starburst centre. I used a stencil for the heart but just sketched the other shapes until I got what I liked.
Once cut we let the kids colour the shapes if they wanted. Punched a hole in the pointed end of each heart, one end of the leaf and the centre of the starburst.
To assemble the flower, you can use any lollipop pop you want. We used tootsie pops. First the starburst gets feed through the end of the lollipop, then the three hearts and finally the leaf. Space them out evenly and place a small piece of tape over the leaf to hold everything in place.
We did this with my sisters Sunday school class. The kids thought they were great and each got to choose one person to give their flowers to. The leaf acts as the tag so we wrote the to's and from's there. We tied this craft into a "Loving your Neighbour" story.
Depending on what lollipops you use, we also covered some up with tissue paper and fastened with ribbon.
But that about wraps up these sweet Valentine's day gifts. Our Sunday School kids loved them and I'm sure your kids will too!
Be Inspired...
Get Creative!
My next post are these adorable lollipop flowers. At first glance they are a pretty flower... But the petals are made of hearts! And that's what makes this craft so special.
It's quite easy too! We used plain coloured card stock to cut the pieces. For each flower you need three hearts, one leaf and a starburst centre. I used a stencil for the heart but just sketched the other shapes until I got what I liked.
Once cut we let the kids colour the shapes if they wanted. Punched a hole in the pointed end of each heart, one end of the leaf and the centre of the starburst.
To assemble the flower, you can use any lollipop pop you want. We used tootsie pops. First the starburst gets feed through the end of the lollipop, then the three hearts and finally the leaf. Space them out evenly and place a small piece of tape over the leaf to hold everything in place.
We did this with my sisters Sunday school class. The kids thought they were great and each got to choose one person to give their flowers to. The leaf acts as the tag so we wrote the to's and from's there. We tied this craft into a "Loving your Neighbour" story.
Depending on what lollipops you use, we also covered some up with tissue paper and fastened with ribbon.
But that about wraps up these sweet Valentine's day gifts. Our Sunday School kids loved them and I'm sure your kids will too!
Be Inspired...
Get Creative!
Tuesday, 12 February 2013
A Hug that Lasts Forever
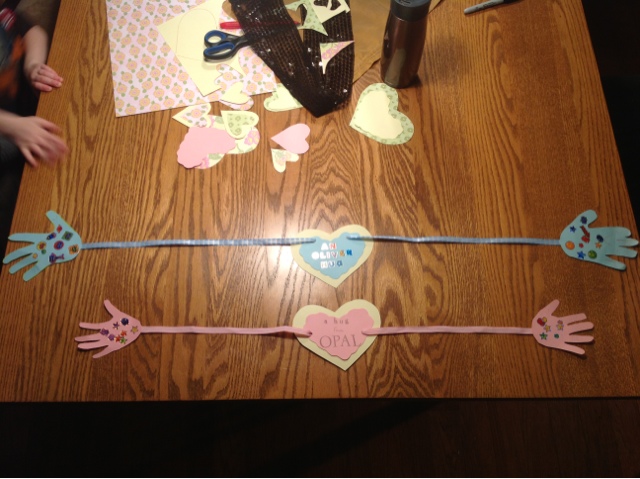
There's still time to get inspired for Valentine's Day! so here is My second post of Hearts for Love.
This time I made these super cute hugs with both my kids to give their Dad.
I used plain coloured card stock. Traced each of my kids hands and cut them out. The kids coloured their hand prints and decorated them with stickers. While they got creative, I cut out some hearts. A large and medium heart for the middle which I decorated saying "an Oliver hug" and "a hug from Opal". The back of the two hearts was were we wrote "I love you as far as my arms can stretch and more".
I measured with ribbon the span from my kids left wrist, across their chest and all he way to their right wrist. I attached one end of the ribbon to one handprint and finished it off with a small heart. Fed the ribbon through the two wholes punched in the large heart and attached the other end to the other hand print.
and thats how we made the hugs that will last forever, for my kids to give their Dad for Valentine's Day. I wrote on the back of each of the large hearts, the age that the kids are so Daddy will always remember what their hugs were like at 3 1/2 and 1 1/2.
Hope you Enjoyed! More to come of Hearts for Love.
Be Inspired...
Get Creative!
This time I made these super cute hugs with both my kids to give their Dad.
I used plain coloured card stock. Traced each of my kids hands and cut them out. The kids coloured their hand prints and decorated them with stickers. While they got creative, I cut out some hearts. A large and medium heart for the middle which I decorated saying "an Oliver hug" and "a hug from Opal". The back of the two hearts was were we wrote "I love you as far as my arms can stretch and more".
I measured with ribbon the span from my kids left wrist, across their chest and all he way to their right wrist. I attached one end of the ribbon to one handprint and finished it off with a small heart. Fed the ribbon through the two wholes punched in the large heart and attached the other end to the other hand print.
and thats how we made the hugs that will last forever, for my kids to give their Dad for Valentine's Day. I wrote on the back of each of the large hearts, the age that the kids are so Daddy will always remember what their hugs were like at 3 1/2 and 1 1/2.
Hope you Enjoyed! More to come of Hearts for Love.
Be Inspired...
Get Creative!
Button Valentine's
For my first post of Hearts for Love, just in time for Valentine's Day, I would like to share these cute heart button Valentine's my son and I made for his class mates.
I found these great button packs at Michael's. I thought it was a cute way to add something special instead of giving out candy.
I used some simple heart stencils and cut out various sizes in several different coloured and patterned papers. I paired a large and small heart together and let Oliver colour the back before writing the "to" and "from" info.
Finished off, by pinning the pin in the centre of the heart and they're ready for delivery on Valentine's Day!
Hope you enjoyed this quick little post. More Hearts for Love to come...
Be Inspired...
Get Creative!
I found these great button packs at Michael's. I thought it was a cute way to add something special instead of giving out candy.
I used some simple heart stencils and cut out various sizes in several different coloured and patterned papers. I paired a large and small heart together and let Oliver colour the back before writing the "to" and "from" info.
Finished off, by pinning the pin in the centre of the heart and they're ready for delivery on Valentine's Day!
Hope you enjoyed this quick little post. More Hearts for Love to come...
Be Inspired...
Get Creative!
Saturday, 6 October 2012
Colourful Play Keys
Hope everyone is enjoying their Thanksgiving long weekend.
I thought I'd brighten this gloomy day with this quick post about these super cute multi-coloured play keys.
Do you have a ton of odd keys laying in your junk drawer that you don't know what they open?
And do you have young kids who love to steel your actual keys to play with and usually end up setting your car alarm off or just loosing your keys all together... (I have been through this all to many times).
Well, I propose a solution that requires no expense and little work.
I was inspired about this idea from a pin on Pinterest. This example used nail polish in various coloures to colour code their existing keys. Also a geniuses idea!
So I thought why not paint the entire body of a key I don't need and make some fun play keys for my kids.
So that's what I did. I picked two set of complimenting nail polish colours (one boy version and one girl version) and I applied three coats on each side of each key.
And voila! A set of colourful keys for both my son and daughter.
Two tips:
- use wax paper to set the keys on while painting (I used plain paper the first time and it stuck to the nail polish and was a pain to get off)
- once the nail polish is dry you can scrap off any access to ensure the edges are smooth
Also I made these for my kids whom are old enough not to put them in their mouth. I am not sure how the nail polish will stand up or if it would chip.
And that's that! Hope you enjoyed this bright little post and I'm sure if you make these for your kids, they'll love them.
Be inspired,
I thought I'd brighten this gloomy day with this quick post about these super cute multi-coloured play keys.
Do you have a ton of odd keys laying in your junk drawer that you don't know what they open?
And do you have young kids who love to steel your actual keys to play with and usually end up setting your car alarm off or just loosing your keys all together... (I have been through this all to many times).
Well, I propose a solution that requires no expense and little work.
I was inspired about this idea from a pin on Pinterest. This example used nail polish in various coloures to colour code their existing keys. Also a geniuses idea!
So I thought why not paint the entire body of a key I don't need and make some fun play keys for my kids.
So that's what I did. I picked two set of complimenting nail polish colours (one boy version and one girl version) and I applied three coats on each side of each key.
And voila! A set of colourful keys for both my son and daughter.
Two tips:
- use wax paper to set the keys on while painting (I used plain paper the first time and it stuck to the nail polish and was a pain to get off)
- once the nail polish is dry you can scrap off any access to ensure the edges are smooth
Also I made these for my kids whom are old enough not to put them in their mouth. I am not sure how the nail polish will stand up or if it would chip.
And that's that! Hope you enjoyed this bright little post and I'm sure if you make these for your kids, they'll love them.
Be inspired,
Get Creative!
Wednesday, 28 March 2012
Family Wall Art
Hi everyone! It's been a little while since I blogged about Creativity... so I thought I would tell you about my latest DIY art project for our Mudroom! Check out all of our Mudroom Makeover pictures in the album on my Facebook page. Mudrooms are the perfect place to have a bit of fun with colour and art. It's not a focal room of the house and usually it is just a room for the family. For our mudroom we painted the walls in Benjamin Moore's Cedar Green which is a wonderfully lively colour that is very energetic and welcoming. It really added a great feel to the room and our entire family love walking through it every time we enter and exit the house!
Since it is, as I said a room solely for the family I wanted to add an extra special touch that would really add a homey feel and could really be a memorable part of the house. So I put my talented family to work at what they love to do so much (Hubby too but he wasn't too thrilled about the mess) and we made some great art from hand and foot prints!
| Finished Product |
What we used:
- brown craft paper cut into 12" by 12" squares
- white acrylic paint (I just used whatever white paint I had lying around)
- leftover wall paint (Cedar Green Colour)
- square shadow frames from IKEA (I used white for these but you can get them in several finishes)
- paper plates
- paint brush
| Supplies |
With all our supplies ready to go Oliver and I started at the painting. We had to do the "mom" and "dad's" squares in stages as I wanted to overlap them with the kids hand prints too.
I assisted Oliver with doing his hands upside down with his thumbs and index fingers touching so that the space between his hands made a heart. We practised this style of hand prints while making Cards for Valentine's Day.
I then printed Opal's foot prints with her heals touching so that it also reflected the shape of a heart.
Just for fun I printed each of our two dogs and cats paws but I didn't end up framing them.
| Oliver's Hand prints and Opal's Footprints |
| Spudnick, Apple and Pickles Paw Prints |
Aaron and I then painted our own hands and made white hand prints on the last two squares. It took some arm twisting to get Aaron to paint (he doesn't like being crafty!) but I eventually got him to join in.
| Daddy and Son, Mommy and Daughter |
Once all the white paint was dry we went and did the second faze of our art. We used the left over wall paint in Cedar Green to create a layered look. We printed Oliver's hand on top of Aaron's and Opals hand print on top of mine (it is still super hard to print an infants hand). Then on the kids art pieces I added some of the green paint by painting a heart in the space in between Oliver's hands and painted a outline of a heart around Opals Footprints.
| Oliver and Opals Heart Inspired Prints |
That was the extent of our painting for this project, not a lot but just enough to have some fun. It is extremely fun to do hand and foot prints with the kids and this time it included the whole family which was great. I think our art turned out awesome!
| All of our finished art before getting framed. |
Then when all the paint was dry I went ahead and framed the individual pieces of art. I bought shadow box frames from Ikea in white so that they accented the white prints. I traced the glass onto the brown paper to trim the art to the perfect size for the frame. I Cleaned the glass until it was spotless and shiny with my Norwex cloths (love them!!).
| Framing supplies |
Finally I put them together and they were ready to hang. We hung them evenly spaced across the wall from the corner of the room to the edge of the cabinet. We also hung them only about 9 inches from the ceiling. I wanted them to stand out but also wanted to leave room for some hooks and coats. The result actually made the room feel really tall and spacious! I also had room to add a rub on wall quote that perfectly finished off the whole family focal wall.
| Finished Product Hung on the Wall |
| Finished Wall |
All in all this was a really fun project that I will always have to cherish. It was the perfect touch for this family space and I love the way the overlapping colours add texture to the bright wall colour! I hope you enjoyed this fun little post. You could do this project in many different colours and also by stamping many other shaped items instead of hand/foot prints. You can even try using cookie cutters for a inverted version! There is so much you could do with just brown paper, paint, and a classic frame... just have fun with it!
Be Inspired...
Get Creative!
Tuesday, 14 February 2012
Hand Print Valentines
Oliver and I got crafty and made Valentines for the family today. When it comes to painting with Oliver the funnest way to go is hand prints (its a bit less messy too!). I love seeing his little hands printed into all different colours and designs. Since it is Valentines Day the most suiting design would be hearts... so we printed his hands upside down with his thumbs and pointer fingers together to make a heart with the space between his two hands. That was the plan anyway!
What We Used:
- Card Stock
- Acrylic Paint
- Paper Plates
- And Little Hands
We took turns painting the paint onto his hands with a paint brush. Then I help him press his hands down onto the card stock. We did two different colours. So we did one hand with one colour first, washed our hands and then did the other hand with the other colour.
Oliver choose the colours so the hand prints don't look very Valentine themed... but they do look cute. And I love the heart it makes!
I had some card stock with a multi-coloured foot print border left over from some invitations I made a while ago. I thought it looked cute with the hand prints and I tried to coordinate the colours with the coloured footprints. Most of them were sucessful but their were a few where Oliver got caried away and the heart shape isn't completely visable. But all in all Oliver did a pretty good job... now it was Mommy's turn to get creative.
I cut some hearts out of yellow card stock using the old "fold the paper in half and cut a hook shape which unfolds to make a heart" trick. After a few tries I cut one that fit in the heart shape of Oliver's hands so I used that as a template and traced it on all the other folded card stock pieces. I cut them all out and carried on. I try to utilise every scrap piece of paper when making cards or scrap booking, so I used the folded pieces of card stock left over after cutting the heart on the back for a quick heart embelishment.
I stamped "be mine" with red ink on the little hearts... which I thought were so cute. And "Valentine" on the back over top of of the heart cut out.
Then with a white button and a needle and thread I hand stitched the heart to the card right in the heart space that Oliver's hands created.
And that was out Valentine's Day craft! I'm sure our family will love them and Oliver is super excited about handing them out and showing them off! Happy Valentine's Day!
Be inspired...
Get Creative!
Friday, 16 December 2011
Christmas Bulbs
The kids and I decorated Christmas bulbs!
I bought a package of 6 ready to paint glass bulbs at a craft store in Vaughn Mall. I think they may have been primed because they had a cream matte finish. So I bought red, white and gold acrylic paint and we went to town.
To start I swirled some gold metallic paint around the bulb with my hands to give the bulb a nice background tone.
Oliver's were easy! And he loved it... he loves anything to do with getting his hands dirty. The easiest way I could get most of his hand print on the bulb without smudging was if I let him hold the buld in his palms with both hands. We practised a few times and then he helped me paint his fingers and palms. I told him to open his hands then I rested the buld in his hands and let him hold it for a few seconds. I told him to let go and then I set them out to dry.
Opal's on the other hand... were a very different story. Foot prints for young ins are not easy as it is... try it on a bulb and it just gets harder... try a hand print on a bulb! It can't be done! So we did her foot print. But not without a few failed attempts. Once with red paint which I swirled around with my hands to blend in and once with white paint. Finally Hubby had to step in and we pulled it off!
Once they were dry I used permanent marker to write the year and their names on and tied some bronze coloured ribbon in a bow at the top. We made 6 bulbs, I kept a set for myself and we gave my parents (Nana & Papa) and Hubby's parents (Grandma & Grandpa) a set for Christmas.
They All Loved Them!
Be inspired...
Get Creative!
Saturday, 10 December 2011
Reindeer Foot and Hand Prints
The kids and I were busy today creating! My Hubby brought home a giant roll of brown paper the other day for our Christmas gifts. I thought it would be cute to decorate the paper with Christmas themed hand and feet prints of the kids. So to practise we made reindeer faces with their hands and feet and ended up with a keepsake on canvas.
What we used:
13`` by 21`` white canvas
beige acrylic paint
brown acrylic paint
black acrylic paint
red acrylic paint
paper plates
permanent marker
Their feet are the faces and their hands made the antlers. Then we used their thumbs to make the eyes and nose. Using only THEIR hand, foot and thumbs for THEIR individual reindeer ensured that the reindeer features looked proportioned. Then I just wrote with permanent marker the year and their names beside each face. Simple right!
I soon realised that hand prints with young kiddies can be tricky. I wasn't intentionally planning on writing Reindeer at the bottom but my son got carried away with his finger painting and we ended up with a blob of beige paint at the bottom of the canvas. So I made it into a large R and wrote eindeer beside it and I think it looks really cute!
Now we have a super adorable painting keepsake that I can bring out every year and show off too our family and friends!
I hope you enjoyed this quick post...
Be inspired...
Get Creative!
Subscribe to:
Posts (Atom)