Friday, 15 August 2014

Splish Splash 1st Birthday Party

Flashback Friday!  Thought I would take this opportunity to tell you about My daughter's first birthday party (who is now 3) wow how time flies!


I am always trying to come up with different themes for the kids parties.  And first birthday's are always a bit more tricky.  They are too little to say what they want, and you want to throw a party that is age appropriate yet not too babyish.

So I came up with a Bath Theme:

The Lyrics from "Splish Spalsh, I was Taking a Bath" turned out to be my inspiration. 


I took a bunch of props out to our trailer for a mini photo shoot, so that I could incorporate pictures of Opal into the invitation.  For the front picture, I choose my favorite dresses that she wore from Newborn to 12 months.  Strung up a cloths line and hung them with clothes pins.  I think it was a cute way to show how much she had grown in her first year.


For the inside, we used a tin bucket, filled it with water and bubble bath and took pictures of her having a bath.  Printed out the party details and incorporated the lyrics of the song subtly through-out the invite.


My favorite part of the invitation was the back.  We brought some teddy bears and placed them in a row with Opal facing away from the camera.  The saying I placed under the picture says it all!


I decorated for the party in bath like colours.  Meaning; blues and teals, white, silver and white.  I threw in some yellow and hinted the decor with rubber duckies.

The wall that accented as a backdrop for the cake eating pictures, was a full balloon wall.  Basically I stapled (I know, but it only made tiny holes! And at that point I was too frustrated with the 10 different tapes I tried to let it bother me) different coloured and sized balloons to the wall to represent floating bubbles.

I incorporated a floral centerpiece of yellow mums and white hydrangeas with blue and teal glass gems and white feathers filling the clear vase.


I hung yellow paper lanterns and teal tissue puffs in various areas and used white feather boas to add a sudsy look.

I also incorporated more of the song lyrics with a picture display from the photo shoot.  I printed the various pictures with one line of lyrics on each picture and hung them in order on a rope with clothes pins.


For the favors I made sponge balls.  They were pretty easy to make.  You find direction on how to make them here;  But I bought multi-coloured sponges, cut them into strips and tied eight of the pieces together, creating a cute multi-coloured ball of sponge.  I put a bubble tag on the ones we gave out at the end of the party and tied a mini duckie to the tie string.  I had extras out for the kids to play with, since we set up two blow up pools in the backyard with lots of bubble bath and a bubble machine going to create a bath like atmosphere.


Another small detail that I incorporated was a bowl of bubble bath punch.  It is made with blue Hawaiian juice pored over vanilla ice cream to create what looks like a very inviting bubble bath.  Add some floating duckies and I think it made a great feature.  (I took the picture after it had sat for a while so it doesn't look as bubbly as it was).


The table was covered with yellow satin overlays.  We used yellow paper plates and found these super cute duckie napkins.  I mixed them in with some plain teal napkins too, to add more of a variety in colour.


For the cake, (my favorite part!),  I baked three Baby's First Birthday Cake layers.  Iced between the first two layers and then took the third layer and cut a circle out of the centre leaving a ring of cake.  Placed that on top the first two and iced the entire cake.  I then took half chilled blue jello and filled the top layer, to make a bath tub!  cute huh?  I made some cake balls and covered them with blue and white chocolate partially swirled together to look like bubbles.  I also formed two cake balls to look like a rubber duck and covered them in yellow chocolate.


I was extremely happy with how the cake turned out and the whole party was a huge success!  My daughter thoroughly enjoyed herself!


This is a picture of the adorable dress my Mom made her for her party.  I loved those Prints!


I forgot how much she loved rubber duckies at that age!

That's all for now!

Be inspired...
Get Creative!


Thursday, 13 June 2013

A Hand-painted Gift for Dad


Hi there,  yes it's been too long since the last time I've done a post.  So I thought I would share this sweet gift for Dad.

For this project, I purchased plain wood coat racks from a local Micheal's.  Took them home and painted then with this super sweet saying.  

What does Dad always seem to get as a gift?  Well in our family it's TIES.  So now he has a sweet place to put them.  Take a look...


I originally saw this idea off, of course, Pinterest.  The original blogger is Poppy's at Play (http://poppiesatplay.blogspot.ca/2011/06/fathers-day-gift-idea.html).  She actually made her own tie hook and then used a vinyl decal.

I actually made these for the father's in our family for Christmas, and was busy making many other items too.   I found it much easier to purchase a pre-made one.  I painted the whole plaque with a tuape first and then with a cream colour.  This allowed me to sand some of the edges and see a slightly darker shade through the top coat.  Which gave a slightly more masculine (rustic) look.

I then painted the saying.  I printed the saying in the required size on paper and traced it out with a pen, which left an outline guideline to go by when it was time to paint the letters.  This trick helped a lot!


I also made a version for "Papa" and "Grandpa" which worked out super sweet as well!


Well that's all for now!  Hope everyone enjoys their Father's Day!  There will be another fathers day post to follow (I just need to give the gifts to the Dad's first and I don't want to ruin the surprise!).


Be Inspired...

Get Creative!


Thursday, 14 February 2013

Home Made Tea Bags

Hope everyone had a fantastic Valentine's Day. Here is our last post of hearts for love... I know it's a bit late for this year around but it's never to early to find inspiration for next year!

I want to share these adorable tea bags I've made with my Sister. She primarily made them for her boyfriend, they turned out so cute we just had to make more. We made them for her Sunday school kids to give to their parents, and I made a couple for my sons teachers.

The idea came from this blogger who explains great instructions.
http://asubtlerevelry.com/handmade-valentine-youre-tea-riffic

We tried it out that way but also made our own adjustments.

First of all we cut out several different shapes of hearts, also some straight ended and some scalloped (the scalloped ones were a bit of a pain to cut). Coffee filters is actually what is used to make these tea bags and they can start to rip if they are over worked, this mainly happened at the final sewing step.

One change we started making is, we started off by sewing the two hearts together at the centre "v" part of the heart. We stopped just diagonal from that point and left a length of string to sew the rest once filled. Once it is completely sewn, we left a long enough tail to make the pull string that now comes from the centre of the heart which I think is very cute. This way also eliminates having to punch a whole in the heart, which is one less thing you have to do. And of course a printed tag finishes off the tea bag perfectly.

The other thing I want to tell you is the sewing method in the original post is certainly nice and practical... But it takes forever! We found that a straight stitch worked up a lot faster and actually created quite a nice look and certainly still holds the contents in place.

For our tea we used dehydrated strawberries and kiwi. And added some rock sugar for sweetening which is some German brand that I cannot translate. We let the kids fill them up and finished sewing from the point we left off.

I placed the ones for my sons teachers, in small ziplock bags with labels describing the flavour.

And that's our home made tea experience! I think they are very clever and unbelievably cute! And who doesn't love a cup of tea! This obviously made a great valentines gift, but the possibilities are really endless since you could do any shape. And any flavour for that matter, just dehydrate whatever fruit you want and there you go. You could also use leaf tea bought at specialty tea stores, or I thought of dried apples and cinnamon sticks. I could have a hay day and I'm sure you could too. Enjoy!

Be inspired...
Get Creative!


Wednesday, 13 February 2013

Lollipop Heart Flowers

HAPPY VALENTINE'S DAY!!!

My next post are these adorable lollipop flowers. At first glance they are a pretty flower... But the petals are made of hearts! And that's what makes this craft so special.

It's quite easy too! We used plain coloured card stock to cut the pieces. For each flower you need three hearts, one leaf and a starburst centre. I used a stencil for the heart but just sketched the other shapes until I got what I liked.

Once cut we let the kids colour the shapes if they wanted. Punched a hole in the pointed end of each heart, one end of the leaf and the centre of the starburst.

To assemble the flower, you can use any lollipop pop you want. We used tootsie pops. First the starburst gets feed through the end of the lollipop, then the three hearts and finally the leaf. Space them out evenly and place a small piece of tape over the leaf to hold everything in place.

We did this with my sisters Sunday school class. The kids thought they were great and each got to choose one person to give their flowers to. The leaf acts as the tag so we wrote the to's and from's there. We tied this craft into a "Loving your Neighbour" story.

Depending on what lollipops you use, we also covered some up with tissue paper and fastened with ribbon.

But that about wraps up these sweet Valentine's day gifts. Our Sunday School kids loved them and I'm sure your kids will too!

Be Inspired...
Get Creative!


Tuesday, 12 February 2013

A Hug that Lasts Forever

There's still time to get inspired for Valentine's Day! so here is My second post of Hearts for Love.

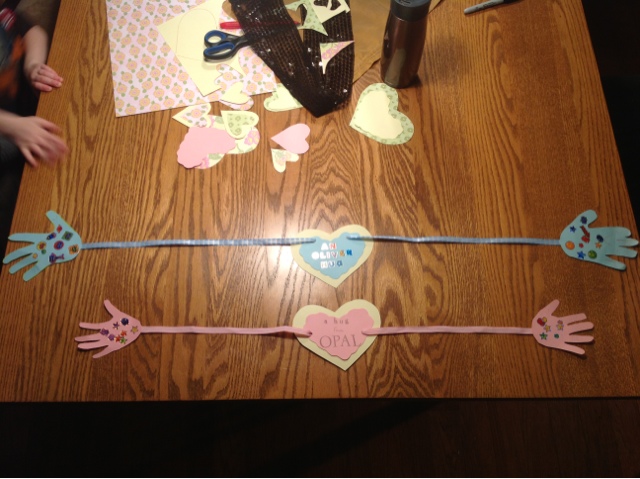
This time I made these super cute hugs with both my kids to give their Dad.

I used plain coloured card stock. Traced each of my kids hands and cut them out. The kids coloured their hand prints and decorated them with stickers. While they got creative, I cut out some hearts. A large and medium heart for the middle which I decorated saying "an Oliver hug" and "a hug from Opal". The back of the two hearts was were we wrote "I love you as far as my arms can stretch and more".

I measured with ribbon the span from my kids left wrist, across their chest and all he way to their right wrist. I attached one end of the ribbon to one handprint and finished it off with a small heart. Fed the ribbon through the two wholes punched in the large heart and attached the other end to the other hand print.

and thats how we made the hugs that will last forever, for my kids to give their Dad for Valentine's Day. I wrote on the back of each of the large hearts, the age that the kids are so Daddy will always remember what their hugs were like at 3 1/2 and 1 1/2.

Hope you Enjoyed! More to come of Hearts for Love.

Be Inspired...
Get Creative!


Button Valentine's

For my first post of Hearts for Love, just in time for Valentine's Day, I would like to share these cute heart button Valentine's my son and I made for his class mates.

I found these great button packs at Michael's. I thought it was a cute way to add something special instead of giving out candy.

I used some simple heart stencils and cut out various sizes in several different coloured and patterned papers. I paired a large and small heart together and let Oliver colour the back before writing the "to" and "from" info.

Finished off, by pinning the pin in the centre of the heart and they're ready for delivery on Valentine's Day!

Hope you enjoyed this quick little post. More Hearts for Love to come...

Be Inspired...
Get Creative!


Friday, 9 November 2012

Personalized Dishware

A few weeks ago I created some personalized dishes and mug sets as gifts for two of my closest friends.

Now just to give you some background; my girlfriend is, shall I say, a Tiffany fanatic and her husband... Is a geniuses when it comes to computers and frankly any type of technology. So I wanted to come with gifts for their birthdays that really said something about them. So I came up with designs for each of them which I incorporated onto plain white Dishware. And how did I portray these designs you ask? Well that's what this post is all about!

As I said before I found some nice quality plain white Dishware in a style that I liked.


On the computer, I used Word to design my templates where I used the technique described in my Painting Words post to mirror the text and images. I came up with several templates and I would share them, but I can't figure out how to upload a document for download. So if anyone would like to tackle this project and see my other templates leave a comment with your e-mail and I can send them to you.


The next step is a bit delicate... And of you are comfortable free handing it, you don't need to follow it. But I wanted a guideline as these dishes were gifts and I wanted them to look great.

So after each template is cut out, turn it over and use a slightly damp cloth to wet the paper. Once the lettering shows dark through the back of the paper you can place it on the dishware of choice and use you fingertip to firmly press along the design.  I taped my design in place so it did not move during this process.  Carefully peal away the paper and you will be left with a soft ink transfer of your design.


Dampened Design Template
Transferred Design


It took me a few times to get a dark enough transfer. So If your transfer does not come out right just wipe it off with a wet cloth and try again.

Once my designs were transferred to the Dishware I used permanent marker and carefully, I mean CAREFULLY, drew over the ink transfer.

If you make a mistake or are not happy with your final design, don't fret. Until you bake your Dishware the marker will come off with just a little scrubbing.

Finally once you are happy with your designs you simply bake your Dishware.

One blogger had a good tip in terms of baking temps and times. She recommended to set your oven to 350 degrees and place you dishware on the rack and let your oven pre-heat. Once pre-heated, bake for 30 minutes then turn your oven off.   Let cool completely before removing the pieces from the oven.


I did scrub the design after, and it was in fact permanent. But I would recommend to hand wash.

Viola, personalized dish sets! My friends both loved there's and I hope you give this easy project a try, either as a gift or just for you. There are endless possibilities.


Finished Products
My mustache model


Oh and here are the cards I made for each of them, both were also inspired by some pins on Pinterest.


Feminine Card
Masculine Card


And also the gifts all done up in the pretty boxes I picked up.


Patchwork box with pretty flowers
Rustic damask box with green bow


For my girlfriend I made up these adorable flowers out of cupcake liners and coffee filters... Sound interesting? More explanation to come... Keep an eye out for our next post!


Be inspired

Get Creative!