Saturday 31 July 2010

John Deere Party

It's the little guys first birthday!  What better way to celebrate a little boys 1st birthday who has a half Mennonite Daddy?  John Deere of course!


We kept it simple and just decorated with a few bunches of helium balloons.  I could not find any John Deere themed balloons so I got generic yellow and lime green balloons and wrote JOHN DEERE on them with permanent marker and decorated them with tractor stickers!  (this trick works great, I once threw the Hubby a Tom Tom party and wrote TOM TOM, LEFT and RIGHT on the balloons and it made great conversation pieces... a Tom Tom is a GPS by the way!)


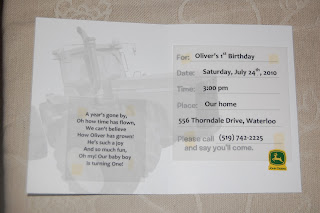
We bought pre done invites because they were a really good deal.  I still wanted to customise them a bit so I printed a really cute One Year poem on Vellum and pasted it in.  Here it is below, I think it is so adorable!

A year's gone by
Oh how time has flown,
We can't believe
How Oliver has grown!
He's such a joy
And so much fun,
Oh my! Our baby boy
is turning One!

I also printed the info on vellum and layered it on top of the printed prefixes to make it look like it was all printed inside and then I didn't have to hand write them all!
Oliver sporting his Birthday hat!

We lucked out at a party store in Groove City when we were on a weekend trip and found everything we could possibly need for a John Deere themed party, which is also where we got the invitations and thank-you cards.  I think the table looks awesome all Decked Out in John Deere print!

Oliver's cousins also sporting their party hats!


the Dinner Table

Gotta love plastic table cloths!  I know their bad for the environment but just roll them up and gone is the mess!  And look how great the table looks with all those tractors...

the Dessert Table! YUM


Cake for the Adults!
Healthy cake for the Kiddies!


The most important part to any birthday, but especially for a 1st birthday, is the cake!  Of course! 
For Oliver and the kids I made a rice flour cake sweetened with maple syrup.  The frosting was cream cheese also whipped with maple syrup.  Click the above picture for the recipe.  I was going for a muddy tire to tie in with the John Deere theme.  Once I iced the cake I placed a cup in the centre and covered the icing with cocoa.  I used a wooden spoon handle to notch ruts around the edge.  Then I cut the same size circle out of a piece of paper and placed it on top of the cake and sprinkled the hole (in the centre) with yellow sugar sprinkles. 
For the adults I decided to try cake balls!  I did a double chocolate version, click the picture to view the recipe.  I covered them with yellow and green chocolate and drizzled some with the contrasting coloured chocolate and sprinkled the rest with various yellow and green sprinkles.  I was very thrilled with how they turned out and they were fairly easy too. 
Both the cakes were a huge success among the adult and miniature guests.  And Oliver was completely thrilled with digging his hands into a slice.


Oliver ultimately enjoying his 1st Birthday Cake!

Oliver suiting got a John Deere tractor as a birthday present from his Nana and Papa.  So I took him and the tractor to Zehrs (that was an interesting trek) and got some pictures done.  The one I used for the back of the Thank-you card was my favourite!  It really captures his charm!


So Oliver had a fantastic 1st Birthday!  We sent the Thank-you cards out and we have tons of great memories!

Be Inspired...

Get Creative!

Friday 23 July 2010

Baby's First Birthday Cake

So who says you have to give your One year old a regular cake filled with tons of sugar and whatever else?  No One!  Why not make a healthy cake for your little one!

One of my favourite site that is full of great home made baby food recipes is Wholesome Baby Food by Momtastic.  They also have a great page the has a whole bunch of great healthy First Birthday Cake Recipes and icing ideas.

I prefer to make a Basic Rice Flour Cake.  I've had the recipe for a couple years and don't remember where I found it.  But here's how I make it.


What You Need:

1/2 cup olive oil
1/2 cup pure maple syrup
2 eggs
2 tsp vanilla extract
2/3 cup brown rice flour
1 tsp baking powder 

Directions:

1) Preheat oven to 350 degrees F (180 C)
2) Grease and flour one 8" cake pan
3) Cream the butter till light
4) Add maple syrup and whip until well blended
5) Beat in egg and vanilla
6) Slowly add flour and baking powder and beat until thoroughly combined
7) Pour into the cake pan and bake for 20 to 25 minutes or until a sharp knife inserted into the middle comes out clean
8) Let cool and remove from pan

And that's how you make a delicious yet healthy birthday cake.  It's wheat free, dairy free and sugar free!  You can make this cake with butter instead of olive oil.  You can also use regular sugar instead of the maple syrup, but it would be much more sweet and dryer as well.  I find this cake very yummy and just sweet enough... I'm not a big fan of super sweet cakes.  The rice flour also makes a very unique texture, almost a bit like a corn meal muffin.  Which I love but some people would prefer finer flour like tapioca flour which would work for this recipe too.


John Deere Themed Cake


Now to decorate!  With a healthy cake you need a health icing.  My favourite is Maple Cream Cheese Frosting.  Here's how you can make it!


What You Need:

1 cup cream cheese
1/2 cup maple syrup

Directions:

1) Take the cream cheese out of the fridge about 1 hour before you start to soften
2) Whisk the cream cheese until light
3) Add the maple syrup and continue to whisk until mixed thoroughly
4) Cool in refrigerator for about 1/2 an hour
5) Ice your cake


This icing is very delicious and goes great with the Rice Cake.  It is very easy to make and super easy to use.  Once you ice the cake you can decorate with anything you like!  This icing provides a great and sticky surface to decorate!


Disney's Cars Themed Cake


I hope you and little ones enjoy this tasty cake!  And have fun decorating it too... that's always my favourite part!


Be Inspired...

Get Creative!

Tuesday 20 July 2010

Cake Balls

For all you cake lovers out there here is the best way to make and eat cake ever! It is becoming more and more popular and you can now even buy them in cake shops! But they are fairly easy to make.


What you need:

1 box of cake mix in desired flavor

1 tub of premade icing in desired flavor

Coloured chocolate

Sprinkles or other toppings of choice

John Deere Themed Cake Balls
Double Chocolate


Directions:

1) Bake cake as directed on package

2) Once cake cools crumble into a mixing bowl

3) Gently fold icing into crumbled cake until well blended

4) Form mixture into balls about 2 tbsp. in size each and place on wax paper

5) Freeze formed balls for approximately 15 minutes
(Depending on the consistency of the mixture you may have to freeze for longer)

6) Melt chocolate in a double boiler being careful not to burn
7) Use a fork to dip balls into chocolate and swirl gently until coated

8) Carefully remove from fork and place on fresh wax paper

9) Add sprinkles or other toppings before chocolate sets

10) Let chocolate set at room temperature

11) Drizzle or decorate with additional chocolate if desired

Note: Try not to refrigerate. The cake will cool faster than the chocolate and cause the balls to sweat.


Disney's Cars Themed Cake Balls
Chocolate Vanilla Swirl
I have made them several times now and they are quite easy to make and very satisfying to eat. Everyone raves over them when I make them. There are also very versatile, you can make them in any variation you want and decorate them in anyway imaginable.


Flavor Variations:

Double Chocolate
- Chocolate Cake with Chocolate Icing

Chocolate Swirl
- Chocolate Cake with Vanilla Icing

Rainbow Vanilla
- Vanilla Cake with coloured sprinkles with Vanilla Icing

French Butter Pecan
- Butter Pecan Cake with French Vanilla Icing

Spiced Cream
- Carrot Cake with Cream Cheese Icing


Three Tiered Cake Pop Cake
Rainbow, Pecan and Carrot

If you’re looking for a bit of a challenge you can try making Cake Pops. The above picture shows three sizes of foam cylinders which I used as the form to make them look like a three tiered cake. I used BBQ spears in order to piers the styro foam, but for better structure I would recommend using the white paper sticks that you can find at your local bulk or baking store. Once you form the cake into balls, place the stick into the center and reshape. You may have to freeze them a bit longer in order for the cake balls not to fall off the stick when dipping into the chocolate. I recommend that you leave a small amount of the cake uncovered by the chocolate near the stick. If the cake it fully covered the thawing cake may crack the chocolate. Place the sticks into something in order for them to stand upright. Then decorate and let set.

And that’s how you can make your very own cake balls! It's fairly easy right? Give them a try and you'll see. You may never want to make a regular cake again!


Be Inspired...


Get Creative!