Sunday 16 September 2012

Painting Words

So I went to try this new technique I found on Pinterest to trace a printed word/name with a ball point pen on a desired object to give you an indented outline for painting.  Well when I attempted to do this with my kids names on their bedroom doors I realised, to my dismay, it would not work.  Firstly our panel doors with wood grain effect made it all too difficult to trace a straight line.  Secondly, these doors are so hard that no pen or pencil would make an indent.  My heart was set on painting these names directly on the doors... and since my free handing skills are good but not that good I had to think for a while of what I could do!

So I came up with an amazing solution!

Painted Name
 
I printed my kids names off Word in the desired size and font... but mirrored.  Then I placed the printed paper face down on  the door in the position I wanted it and rubbed along the letters as to act as a transfer.   It worked... surprisingly, and faintly left the ink from the letters on the paper, on the doors.

I then painted over these transferred names with the desired colour and done!

Doors Before
Doors After


Now this may sound all too easy.  Well once I figured out how to mirror the image with Word 2010, it was.  Sadly with Word 2010, my trusty old Wordart trick didn't work to flip the text in a mirrored position, and my printer doesn't have the automatic option.  So it took several different attempts of a few different techniques before I finally put a few ideas together and made it work!

You can flip Wordart by using the 3D Rotation tool found in the format shape option in the drop down menu, when you right click on your Wordart.  But for some reason it does not let you make Wordart larger then 72 pts, which was not big enough for what I wanted to achieve.

So I found another technique that I will use for much more computer projects now and for those of you who have this same problem here is how to make text on Word "Mirrored":

- type the name/word using the standard word cursor
- selected it
- click copy

The next step is the new trick I learnt:

- when you go to press paste; click the little down arrow underneath it and select "paste special"
- then from that pop up menu select "Picture (Enhanced Metafile)"

This action pastes the text you just copied as a picture. 
Now to rotate it to be Mirrored:

- right click the object and select "Format Picture"
- select 3D rotation
- then in the "X" row under the rotation subtitle enter 180 degrees
- click close and your name is now mirrored!


Here are the pictures off the process from start to finish for the "Painted Names" project.

Print Text in Mirrored Position Using an InkJet Printer

Tape Document Face Down in Desired Area

Ink Transfer Left Behind
Rub Along Text With Finger


Painted Word
Paint Over Letter Transfer


Apply Second Coat

Finished Name On Bedroom Door


And that was my Sunday afternoon project.  I am very thrilled with how the doors turned out!  I painted the names in the same colour as the hall way, which was Benjamin Moore's CC-570 (Night Train).  My best tips for anyone who would like try painting text is to take your time, relax and enjoy! 
 
 
Here is a quick note about another project I did this weekend.  I found these great one time use, "peel & stick" stencils at Dollarama.  So I put them to the test and added a little flare to my powder room.  It worked pretty simple.  They come on a roll so you just have to make sure it's level, smooth it on the wall as you unroll, paint and peel off.  It did bleed a bit, but it was uniform... and I kind of liked the effect.
 
Powder Room with Dash Border Stencil

 
Stencil Sample

Tuesday 4 September 2012

Bird House Gift Tags


Thought I would post a quick little post to share my new creation. I tried to think of something cute and different to use as gifts tags for a gift for my mother-in-law. I found inspiration from a stencil a had laying around and the bird house gift tags were born!


What I used:
- brown card stock
- patterned scrapbook paper in two colours
- pen
- scissors
- permanent maker
- roll on scrapbook tape


I first picked a set of coordinating scrapbook paper and paired them with a combination of two colours of brown card stock.

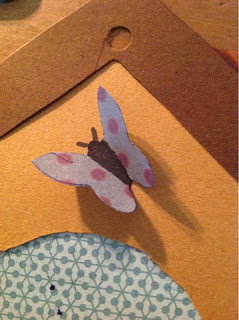
I traced the house part with he hole onto one piece of brown and the roof on the other brown colour. Then I traced the back piece on one of the patterned papers and the butterfly on the other.

I cut all the pieces out. I used a hole punch to start the opening of the main house piece so I could easily get in there with the scissors to cut the circle.

Individual Cut Pieces
Butterfly Piece Folded from Bottom Middle to Top Left Side of Body
Finished Butterfly


I then attached the pieces together. I first attached the back piece by rolling tape onto the back corners of the house piece.  Then the roof by taking the middle peace and the side about one inch in from the edges. Before I attached the butterfly I bent the wings from the middle of the bottom to the top corner on either side of the middle section. I then attached the butterfly by just the middle section. I used a marker to fill in the body of the butterfly and add antenna.

And those are my cute brid house gift tag creations!  The hole in the centre is where I wrote my "to" and "from" information.  So I do recomend to use a subtle tone on tone patterned paper in order to see your writting.


Finished Product
Shown on Two Garden Flowers from Each of my Kids for their Grandmother


Here is the template for this project.  Right click to save image and print it on plain paper as an 8 1/2 x 11 picture. 
Done this way, your bird house gift tag will beasure about 5 inches tall.